“Responsive Flip Book” Documentation by “MPC” v1.2.1
“Responsive Flip Book powered by jQuery”
Created: 01/03/2012
By: MassivePixelCreation
Email: support@mpcreation.pl


Greetings! Thank you for purchasing my theme. If you have any questions that are beyond the scope of this help file, please feel free to ask them on our support forums.
If you prefer video tutorials over a standard help file, video tutorials are coming to vimeo near you! (soon). We tried to make the help file as extensive as possible, don't be scared the Flip Book itself is really easy to use.
Have fun & enjoy, Kuba.Table of Contents
- Folder Structure
- Video Tutorials
- Coming Soon!
- Setting Up the Flip Book
- Using Flip Book Templates
- Credits
A) Folder Structure - top
Responsive Flip Book Folder Structure:
- fb-source - this folder contains thee zip files, each of them represents a pre-made filp book. When you extract one of the zips this it what you will see:
- css - this folder contains styles for the flip book itself and the pages which are displayed by the flip book.
- expressInstall.swf - this file is used by the flash video player (don't worry there is an HTML5 fallback for mobile devices).
- images - this folder contains all of the images used as a graphics for the flip book (ui, shadows, etc.)
- index.php - this is the most important file, this file contains all of the flip book pages and ui.
- js - this folder contains all of the JavaScript files that are used by the Flip Book, the most important to you is the 'flipbook.js'
- pages - this folder contains the assets for the pages, background graphics etc.
- php - this folder contains one very important file called 'settings.php', inside it you can easily customize yor flip book appearance.
- psd - this folder contains all of the psds used for creating this Flip Book expect the graphics used in the main preview (they where containing GraphicRiver items which I cannot share).
- background-patterns - this zip file contains 30+ background patterns that you can use along with the flip book.
B) Video Tutorials - top
The video tutorials are currently not available but we are working on them as you read this, please be patient.
C) Setting Up the Flip Book - top
First of all you need to decide what dimensions will your book be. Then you have to figure out if you want to use images as the pages of your book (this is the easiest way to create the book) or maybe you would like images pages with HTML content (better for SEO). Once you figure out those basic thing proceed to the next section.
C.1) Basic Flip Book Settings - top
All of the flip book settings can be easily changed in the file that is stored in the php folder, called 'settings.php', open it. As you can see each of the Flip Book settings is stored in the PHP variable, simply change the value of the variable and save the file, the changes will be made automatically. List of the settings:
- fb_cont - defines the id of the 'div' inside which the Flip Book is stored along with its UI (this div needs to have a class of 'flipbook-container'.
- fb_id - defines the id of the 'div' inside which the Flip Book is stored, this div has to be placed inside the 'flipbook-container div' and needs to have class of 'flipbook'.
- fb_width - defines the width of the Flip Books single page (you can think of it as a width of the closed book), the value is defined in pixels.
- fb_height - defines the height of the Flip Books page, the value is defined in pixels.
- margin_top - defines the top margin of the book.
- margin_left - defines the left margin of the book.
- margin_right - defines the right margin of the book.
- margin_bottom - defines the bottom margin of the book.
- border_color - defines the border color of the book (value in HEX).
- border_size - defines the size of the flip book border (in pixels).
- border_outline - boolean value (true/false) defines if the 1 pixel outline should be visible around the book.
- border_outline_color - defines the color of the border outline (value in HEX).
- border_radius - defines the radius of the flip book border (value in pixels).
- inner_page_shadows - the flip book by default has pages shadows added, if you want to turn the off you can set this variable to 'false'.
- page_edge - at the edge of the page you can see 2 pixel line added so the book (with border added) looks more 3D, if you don't like this you can turn it off - just set this variable to 'false'.
- zoom_overlay - zoom section has a shadow overlay on top of it, to turn it off set this variable to 'false'.
- zoom_overlay_opacity - defines the opacity of the zoom overlay ( 0 - not visible, 1 - 100% visibility).
- zoom_border_size - size of the border around the zoom section (defined in pixel).
- zoom_border_color - defines the zoom panel border color (value in HEX).
- zoom_outline - boolean value (true/false) defines if the 1 pixel outline should be visible around the zoom panel.
- zoom_outline_color - defines the color of the zoom panel border outline (value in HEX).
- zoom_border_radius - defines the radius of the zoom panel border (value in pixels).
- sa_thumb_width - defines the width of the Show All Pages thumbnail.
- sa_thumb_height - defines the height of the Show All Pages thumbnail.
- sa_thumb_border_size - size of the border around the Show All Pages thumbnail (defined in pixel).
- sa_thumb_border_color - defines the Show All Pages thumbnail border color (value in HEX).
- sa_padding_vertical - vertical spacing between thumbnails in Show All Pages panel (defined in pixels)
- sa_padding_horizontal - horizontal spacing between thumbnails in Show All Pages panel (defined in pixels)
- sa_border_size - size of the border around the Show All Pages panel (defined in pixel).
- sa_border_color - defines the Show All Pages panel border color (value in HEX).
- sa_border_radius - defines the radius of the Show All Pages panel border (value in pixels).
- sa_bg_color - defines the background color of the Show All Pages panel (value in HEX).
- sa_border_outline - boolean value (true/false) defines if the 1 pixel outline should be visible around the Show All Pages panel.
- sa_border_outline_color - defines the color of the Show All Pages panel border outline (value in HEX).
C.2) Other Flip Book Settings - top
You can also change: page urls, table of content index, slide show speed and zoom factor. To do this go to the 'js' folder and open up the 'flipbook.js' file. At the top of the file you will find four variables:
- window.pages - this an Array which defines the custom names for your pages you can use them to link directly to your pages, each of the array cells define one page. Don't worry if you wont define this your url will be number based.
- window.tocIndex - this variable defines the index of your table of content, e.x if you set it to '3' once the table of content button is clicked the user will be redirected to page number 3.
- window.zoomStrength - this variable defines the strength of the zoom (default is 2 - the zoomed page will be twice the size of the normal page).
- window.slideShowInterval - this variable defines the slide show delay (value in milliseconds, default 2000).
C.3) Flip Book Structure - top
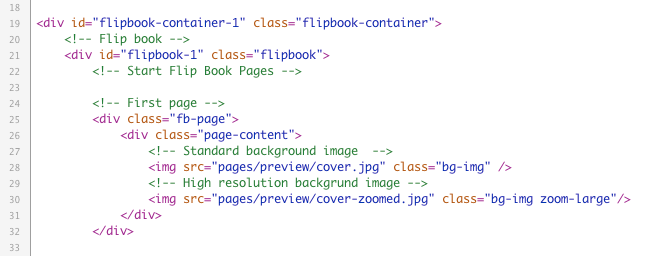
To add pages to the Flip Book open up the 'index.php' file, scroll to the body tag. Inside the body tag you will find a div with a class of 'flipbook-container' this div contains the Book and the Flip Book UI. In 'flipbook-container' you will find another div with a class 'flipbook', this is where the book is keeped (this structure flipbook-container > flipbook has to be intact).
Flipbook Div contains all of the pages. It doesn't mater if they are HTML or images based pages, they need to be stored inside this div. Each of the pages is stored in a div with a class called 'fb-page' (if you want to use a double page, you need to add class called 'double' to this div, don't you worry about it for now we will talk about this later). Fb-page div contains div with a class 'page-content' this is the div where all of the page content goes (I know it may sound complicated but it is not, just see an example). There is only one exception when you use double pages you need one more div with a class container inside the page-content div.
Now you know how each page (and the book) is structured. In the next section you will learn how to add background images to your pages.
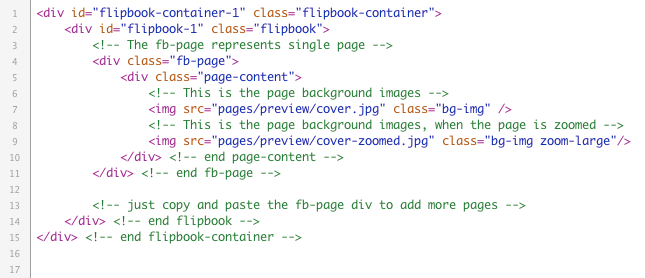
C.4) Adding Background Images - top
To add image as a background of a page, go to the page-content div (or when you use double pages container div) and place the image in the img tag inside. Then add a class to the img tag called 'bg-img'. For the zoom purposes you may want to use higher resolution image, to provide such image place another image with a higher resolution in the img tag and add two calsses: 'bg-img' (because still this is the background image) and then 'zoom-large' to specify that this is a higher resolution image. The image with class of 'zoom-large' will only be enabled when the zoom panel is used. Here is an example of a page with background images:
C.5) Adding HTML Content - top
Adding HTML content to pages is as simple as adding background, all you have to do is place the desired HTML content inside the page-content div (while using double pages it has to be placed inside the container div). Lets look at the example bellow:
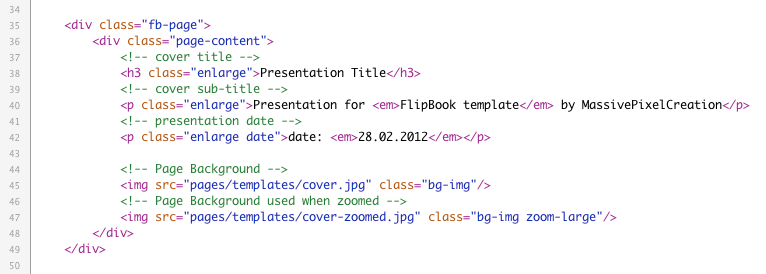
You may have noticed that each of the HTML elements has class 'enlarge' added into it, this is because with responsive design we have to scale the whole book, also the content. Objects with the class enlarge added to it will have their font size and line height adjusted accordingly to the book size. If you want the text to always stay the same size just do not add this class to your objects.
Important thing to note is that you should always use percentage values in the CSS instead of pixels, that way everything will scale as it should when user downsizes the book. If you use pixels the values will stay the same no mater how the book will be downsized.
The best way to learn how you can easily style your pages is to look at the three example book provided along with this files.
C.6) Adding Double Pages - top
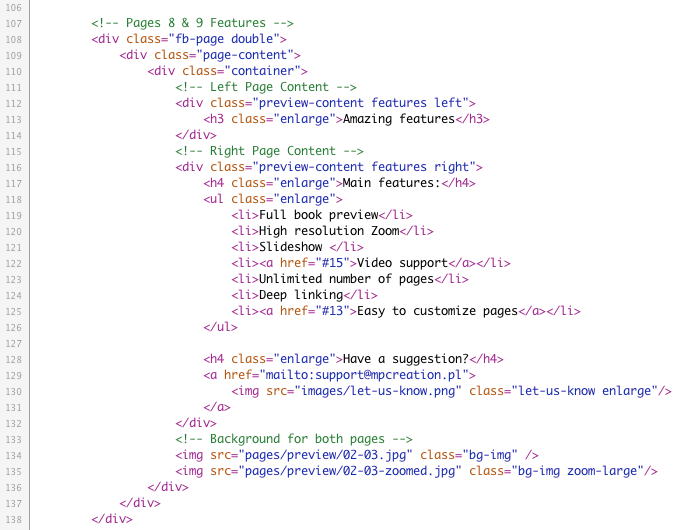
Double pages provide an easier way for designing a page, you don't have to put the images for right and left page all you need to do is use one image that will have the width and height of the open book (you cannot use double pages as covers). To create a double page use the same structure as for a single page (fb-page > page-content) with two differences:
- you need to add the 'double' class to fb-page div (that way flipbook knows it is dealing with double pages).
- inside the page-content div you need to place another div with a class 'container' and inside that div goes your page content.
C.7) Adding Videos - top
Videos are added to the page like any other HTML content, the only difference is that you need to use a special code. The standard video player used for this book has been developed by Adobe it has automatic fallback to HTML5 video when flash is not supported. You can use great tutorial by Lee Brimelow on how to use this video player here. To add a video to the page you need to create a div with a class of 'video' and add the video player code inside it, your code will look something like this:
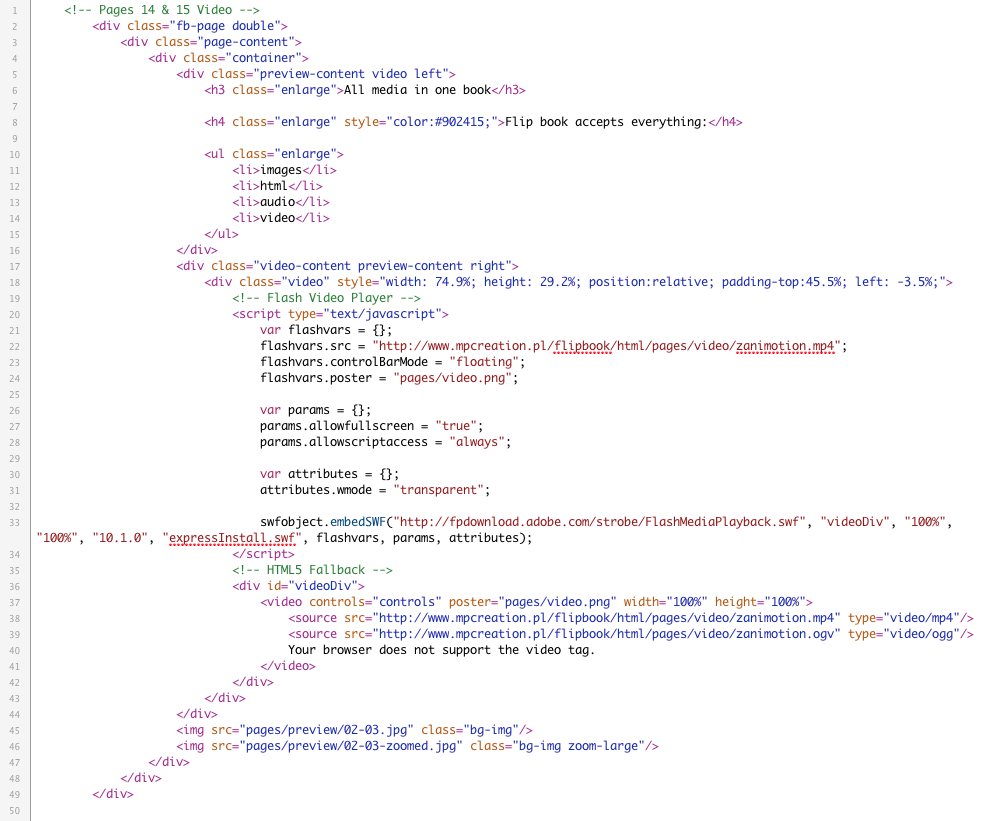
As you can see the first 17 lines of the code is a standard double page implementation. On 18th line the video div starts you can see that its size is set as an inline style, this is actually the size of the video that we will be displaying. Inside the video div (from line 20) there is a script tag which contains the flash video player. under the script tag there is a div with an id of videoDiv this div holds the HTML5 video player.
To setup the flash video player you need to edit few parameters inside the script tag. There is a set of flashvars, we are interested in src (line 22) and poster (line 24):
- src - defines the source for the video player, here you should provide link to your video (it has to be online).
- poster - defines the image that will be displayed instead of your video when it is loading.
To setup the HTML5 video player go to the tag with an id of videoDiv you will find that inside id there is a video tag which has an attribute called poster. This attribute specifies the image which will be displayed when your video is loading. Inside the video tag there are two source tags (you can specify multiple sources), each of those tags specifies the file which will be displayed by the video player. Once you setup the sources and poster you are good to go!
C.8) Navigation - top
Flip Book Navigation is placed inside the flipbook-container div bellow the flipbook div inside the 'index.php file. The div that is responsible for holding all of the UI has a classes of: 'fb-nav' and 'mobile' additionally it can use two other classes:
- stacked - add this class if you want your UI to be stacked together (default)
- spread - add this class if you want your UI to be spread apart (default)
The fb-nav div contains an unordered list each of the list items represent one button, list items can have 4 different classes:
- left - the button will have rounded left side.
- right - the button will have rounded right side.
- center - the button wont have rounded sides.
- round - the button will have rounded left and right side (the best to use with a spread UI layout).
- toc - will display table of content icon on the button.
- zoom - will display zoom icon on the button.
- slideshow - will display slide show icon on the button.
- show-all - will display show all pages icon on the button.
D) Using Flip Book templates - top
Responsive Flip Book comes with 8 different template books for you to use:
You will find each of the styles inside the fb-source folder in the templates.zip To use the templates simply select the style that you like open up the 'index.php' and start editing according to the above guide. Each of the templates can be edited like any other book. You can add/remove pages change css change flip book settings inside the 'settings.php' file. Your imagination is the only barrier!E) Sources and Credits - top
I've used the following plugins and files as listed.
Once again, thank you so much for purchasing this theme. As I said at the beginning, I'd be glad to help you if you have any questions relating this theme. No guarantees, but I'll do my best to assist. If you have any suggestions on how to improve our products or documentation please share them!
MPC