“Responsive Slideshow Photo Gallery Grid ” Documentation by FWDesign - v1.0
“Responsive Slideshow Photo Gallery Grid”
Created: 09/01/2013
By:© FWD (FLASH WEB DESIGN)
Email: contact@webdesign-flash.ro
Thank you for purchasing our component. If you have any questions that are beyond the scope of this help file, please feel free to email via our email. Thanks so much!
Table of Contents
- Important notes read this before anything else.
- How to install the gallery into your html page.
- Constructor parameters.
- Grid playlist.
- Sources and Credits
A) Important notes make sure you read this! - top
Before reading forward you should understand how this grid works. As you will read installing the grid into your html page is straight forward and relative simple. The grid is using <ul> and <li> html elements as the base for the skin and playlist, this way if you like you can generate the content from a php or asp file directly from a database.
Each thumbnail has associated with it a action, when a thumbnail is pressed a new webpage can be opened or a lightbox with a video or image, the paths and other data for the image and video can be easely set.
Make sure you save the thumbnails images close to the size defined in the grid constructor with the thumbnailMaxWidth and thumbnailMaxHeight actually if you can save them at exactly the same size as the thumbnailMaxWidth and thumbnailMaxHeight parameters.
Try to keep the thumbnails count under 150, this way the performance of the grid will be great, if you add more it will get slower specially on mobile.
About the thumbnails image size, save you images close to the size which you add as parameters to thumbnailMaxWidth and thumbnailMaxHeight.
The server is character case sensitive so always use lower case characters!
The examples used in the demo page are located in the demo folder!
B) How to install the gallery into your html page. - top
- Before you start there is a start.html file in the download files, this is a start template file which you can use to copy and paste the needed code this way you can make sure you are not making any mistake while setting up the grid. Please open the start.html file with a text editor.
- Make sure that you copy and paste in the same folder with your html file the java and load folder.
- The javascript and css files must be imported, in the head section of your html file add the code from the below image.
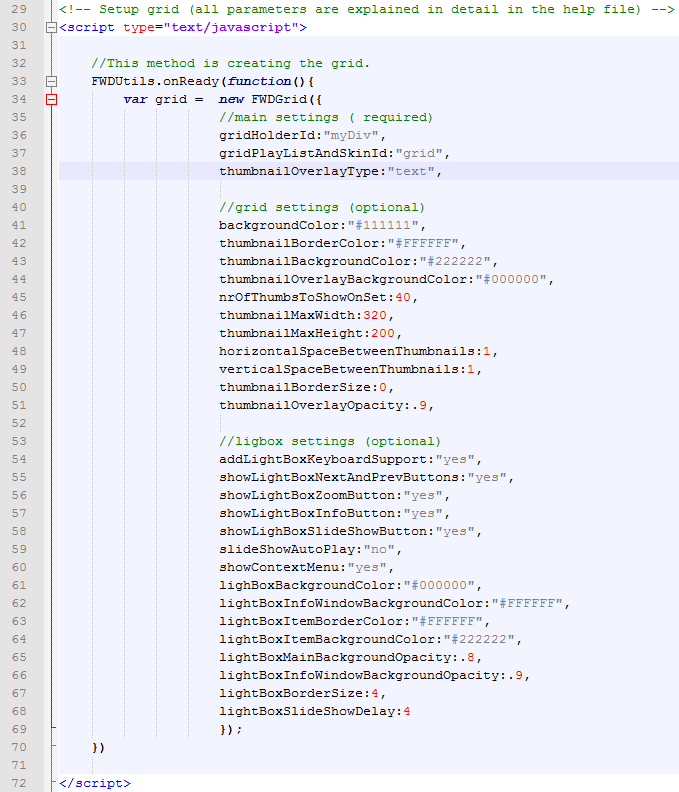
- Next step is to initialize the grid with javascript, in the head section add code from the below image. Please note that all parameters are described in the constructor parameters section
- You need a div into which the grid will be added as a child, so create a div and set an id for it, the id is important because it is passed in the grid constructor, make sure it is unique. The grid is flexible so if you set a width of 600px to the parent div the grid will adapt based on that width, the height of the parent div will be set based on the total number of thumbnails, if you have other html elements below the parent div they will be pushed down (document flow), so inside the body create a div and set an id for it , example in the image below.
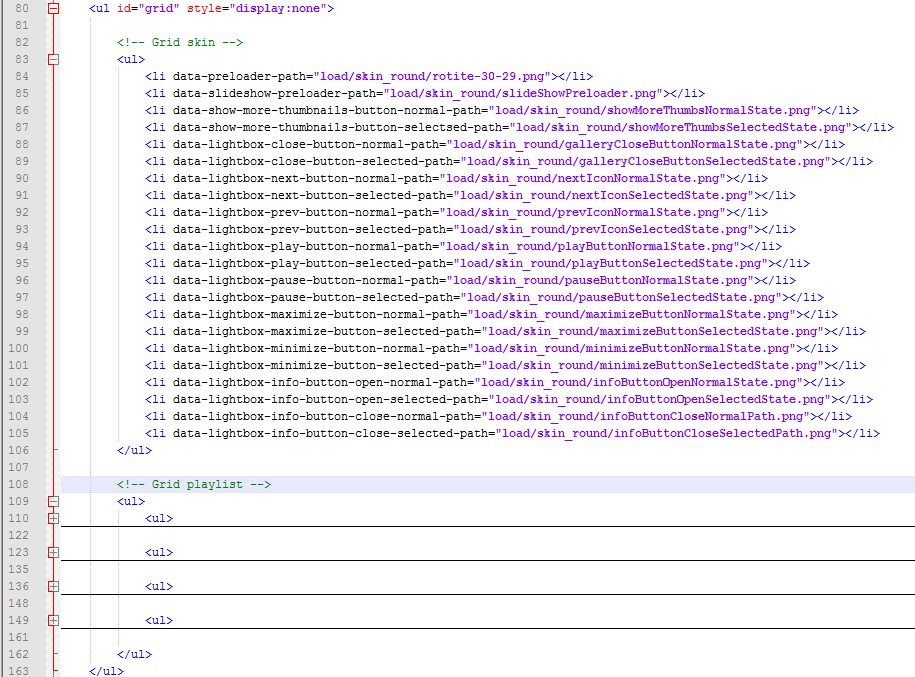
- Next step is to add in the body below the div which you have created an <ul>, make sure you set an id for it, the id is important because it is passed in the grid constructor, make sure it is unique. In this <ul> there are two extra <ul>, the first <ul> represents the settings for the grid skin and the second <ul> represents the grid playlist, in the image below the second <ul> is minimized but make sure you read the grid playlist. section to understand how to add thumbnails and configure the grid playlist.
- This are all the step needed to setup the grid, again all this code is located in the start.html file so you can copy and paste the code easily without errors. Please make sure to read the constructor parameters section to understand all the grid properties.


C) Constructor parameters. - top
This parameters represents the possible setting for the grid they are all visible in the below image and described below.
- gridHolderId:"myDiv" - the div id into which the grid will be added.
- gridPlayListAndSkinId:"grid" - the id of the ul element used as the playlist and skin.
- thumbnailOverlayType:"grid" - this can be icons, text or none, if you need a description over the thumbnails when they are selected set it to text, if you need an media icon over the thumbnails when they are selected set it to icons.
- backgroundColor:"#111111" - the grid background color.
- thumbnailBorderColor:"#FFFFFF" - the thumbnails border color.
- thumbnailBackgroundColor:"#222222" - the thumbnails background color.
- thumbnailOverlayBackgroundColor:"#000000" - the thumbnails overlay color, this is the transparent background behind the thumbnails text.
- nrOfThumbsToShowOnSet:40 - this is an awesome feature which improves the overall performance and speed of loading because in this way not all the thumbnails are loaded and displayed at once. For example if you have a total of 120 thumbnails you can show them in sets of 50 thumbnails, and so initially in the grid the first set of 50 thumbnails are loaded and displayed, and when the "load more thumbnails" button is pressed the next set of 50 thumbnails are loaded and displayed, and finally when the "load more thumbnails" button is pressed again the 20 remaining thumbnails are showed. The number of thumbnails to load per set is customizable, it does not have to be 50 it can be any number that you consider. This feature is optional, if it is disabled all thumbnails are loaded and displayed. If you don't want this feature just delete it from the constructor or set a very high number likr 3000.
- thumbnailMaxWidth:320 - This is the maximum width a thumbnail can have. Increase or decrease this number to change the thumbnails width.
- thumbnailMaxHeight:240 - This is the maximum height a thumbnail can have. Increase or decrease this number to change the thumbnails height.
- horizontalSpaceBetweenThumbnails:1 - the horizontal space between thumbnails.
- verticalSpaceBetweenThumbnails:1 - the vertical space between thumbnails.
- thumbnailBorderSize:0 - thumbnail border size.
- thumbnailOverlayOpacity:.8 - the thumbnails overlay opacity, this is the transparent background behind the thumbnails text, a integer from 0 to 1.
- addLightBoxKeyboardSupport:"yes" - this can be yes or no, adds keyboard support to the lightbox.
- showLightBoxNextAndPrevButtons:"yes" - this can be yes or no, hides or shows the lightbox next and prev buttons.
- showLightBoxZoomButton:"yes" - this can be yes or no, hides or shows the lightbox zoom button.
- showLightBoxInfoButton:"yes" - this can be yes or no, hides or shows the lightbox info button and info window.
- showlightboxSlideShowButton:"yes" - this can be yes or no, hides or shows the lightbox slideshow button.
- slideShowAutoPlay:"yes" - this can be yes or no, slideshow autoplay feature.
- showContextMenu:"yes" - this can be yes or no.
- lightboxBackgroundColor:"#000000" -the lightbox main background color.
- lightBoxInfoWindowBackgroundColor:"#FFFFFF" -the lightbox description window background color.
- lightBoxItemBorderColor:"#FFFFFF" -the lightbox image or video border color.
- lightBoxItemBackgroundColor:"#FFFFFF" -the lightbox image or video background color.
- lightBoxMainBackgroundOpacity:.9 -the lightbox main background opacity, a number from 0 to 1.
- lightBoxInfoWindowBackgroundOpacity:.9 -the lightbox description window background opacity, a number from 0 to 1.
- lightBoxBorderSize:4 -the lightbox image or video border size.
- lightBoxSlideShowDelay:4 -the lightbox slideshow delay in seconds.
D) Grid playlist. - top
This section describes how to add videos, images or open links. Make sure you have opened the start.html file in a text editor for reference. First you need to know that each thumbnail is associated with an image, video or link.Please note that the <li> with the attribute data-info which represents the lightbox description is optional if you disable the info button and info window you don't have to add it. To add more thumbnails just copy paste a <li> element like in the examples below.
Adding images:
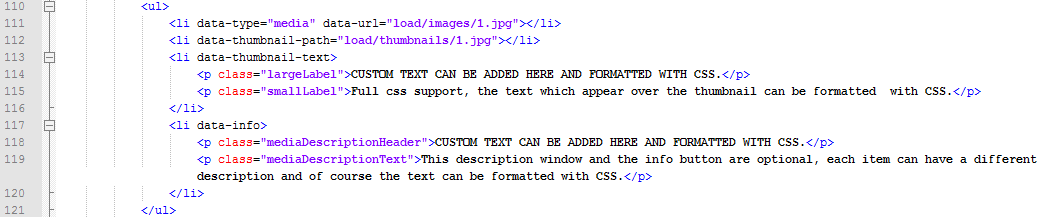
To add an image add the code from the below image into the playlist <ul> just like the image below.The first <li> element represents the image path, the second <li> element represents the thumbnails path, the third <li> element represents the thumbnail description and the forth <li> element represents the lightbox description.
Adding videos from vimeo:
To add a video from vimeo add the code from the below image into the playlist <ul> just like the image below. The first <li> element represents the video data as you can see you can set the video width and height and also the url of the video from vimeo which you want to display, the second <li> element represents the thumbnails path, the third <li> element represents the thumbnail description and the forth <li> element represents the lightbox description.
Adding videos from youtube:
To add a video from youtube add the code from the below image into the playlist <ul> just like the image below. The first <li> element represents the video data as you can see you can set the video width and height and also the url of the video from youtube which you want to display, the second <li> element represents the thumbnails path, the third <li> element represents the thumbnail description and the forth <li> element represents the lightbox description.
Adding a link to open when a thumbnail is pressed:
To add a link to a thumbnail add the code from the below image into the playlist <ul> just like the image below. The first <li> element represents the link data as you can see you can add the url to open when the thumbnail is pressed and the url target, the second <li> element represents the thumbnails path, the third <li> element represents the thumbnail description and the forth <li> element represents the lightbox description.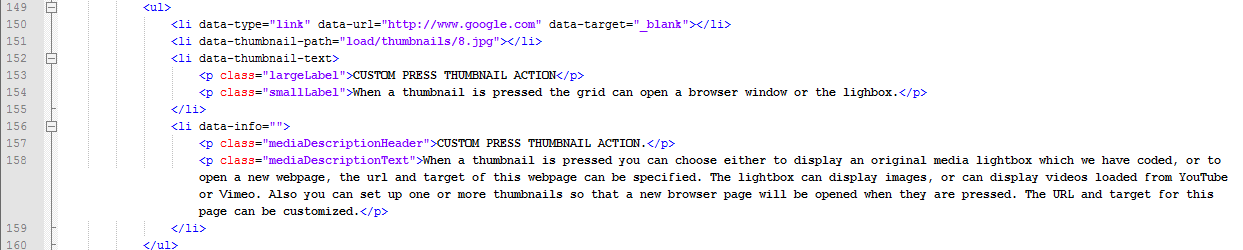
E) Sources and Credits - top
This component was made by Tibi from FWD (FWDesign) FLASH WEB DESIGN, for more information and support contact us at contact@webdesign-flash.ro
Once again, thank you so much for purchasing this item. As I said at the beginning, I'd be glad to help you if you have any questions regarding this gallery and I'll do my best to assist.
FWDesign